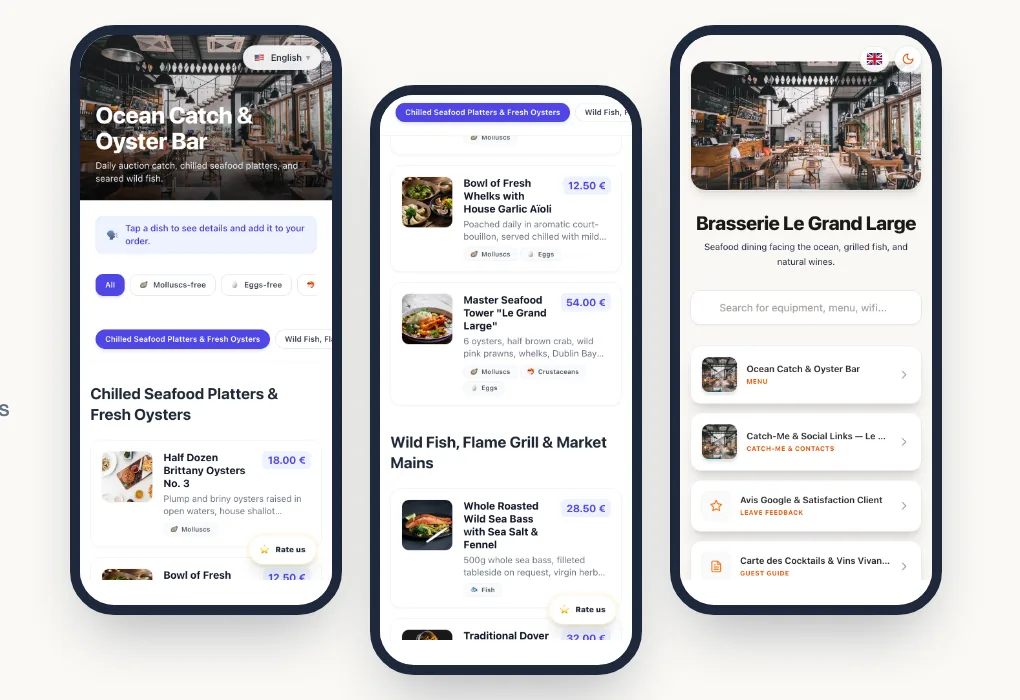
A QR code menu is your restaurant's menu, opened on the guest's phone after scanning a QR code on the table. Done well, it makes service smoother, ends reprints and makes the menu readable for international guests. Done badly, it is an unreadable PDF that annoys everyone.
This guide covers everything you need to get it right: the different types of menus, allergen requirements, translation, printing and placing QR codes, tracking scans and budget.
In short
A good QR code menu is a mobile-first web page (not a PDF), linked to a dynamic QR code you can change without reprinting. It shows allergens dish by dish, reads in the guest's language and updates in seconds.
What exactly is a QR code menu?
Behind the same QR code, there are three very different approaches.
1. A QR code pointing to a PDF. The most common option and the least comfortable. Guests have to zoom and scroll through a page designed for paper, and the file can be slow to load. Every price change means redoing the PDF and uploading it again. Filtering allergens or switching language is impossible.
2. A QR code pointing to a page on your website. Better, as long as the page is designed for phones and easy to update. In practice, restaurant websites are rarely updated as often as the menu.
3. An interactive digital menu. The menu is organised into categories and dishes, with prices, descriptions, photos, allergen filters and a language selector. This is the approach of specialised tools such as Pliyos: the restaurant edits its menu from a dashboard, and guests browse it like an app, without installing anything.
Whatever you choose, one point is decisive: use a dynamic QR code. The printed QR code points to a short address you can redirect at any time. If you change tools or menus, there is nothing to reprint. A static QR code contains the final address itself: if it points to a deleted PDF, all your printed materials become useless. For more detail, read our comparison of static vs dynamic QR codes.
Why switch to a QR code menu?
A QR code menu does not replace hospitality or your staff's advice. It complements them: guests arrive at the order already understanding the menu, and the conversation is about what they feel like eating rather than translating a dish.
Allergens: what the rules say
In the European Union, the INCO Regulation (No 1169/2011) requires food businesses to tell consumers about 14 major allergens, including in dishes served in restaurants: cereals containing gluten, crustaceans, eggs, fish, peanuts, soybeans, milk, tree nuts, celery, mustard, sesame seeds, sulphur dioxide and sulphites, lupin and molluscs. The United Kingdom applies the same list of 14 allergens.
Each country sets the practical rules for dishes that are not prepacked. In France, the information must be available in writing. In other countries, oral information may be accepted as long as written information is available. In every case, the information must be accurate and easy to access before ordering. A digital menu is one of the simplest ways to keep it up to date, dish by dish.
In Pliyos, AI suggests the allergens of each dish from its description and ingredients. These suggestions are an aid: you check and approve them before publishing, because only you know your recipes and suppliers.
For guests, filters exclude every dish containing a given allergen in one tap. That is more reassuring than a table at the end of the menu, and far easier to read on a phone.
For details on the requirements and good practice, read our article on the INCO Regulation and allergen information.
Translating your menu for international guests
In tourist areas, a menu in one language loses customers before they even walk in. With a digital menu, guests choose their language and see the whole menu translated: dish names, descriptions and allergens.
A few tips for a good translation:
- Choose the languages of your real guests. English, Spanish, German, Italian, Chinese: look at who you actually welcome rather than enabling everything.
- Keep the names of specialities. "Bœuf bourguignon" or "tarte Tatin" stay as they are, with a translated description. That is often what the visitor came for.
- Proofread your signature dishes. Automatic translation does most of the work, but having a native speaker review your key dishes avoids awkward wording.
On Pliyos, the Resto plan includes your original language plus 3 translation languages, chosen from more than 100. You can add more for €1 per month per language. Our article on menu translation for tourists covers the mistakes to avoid.
Creating your QR code menu step by step
1. Start from your current menu. A photo of the paper menu, the existing PDF or the address of your online menu (your website or a booking platform) is enough. With Pliyos, AI reads the document and extracts categories, dishes, descriptions and prices.
2. Check and complete. Proofread prices, correct what needs correcting, and approve allergens. This step needs the most attention: allow a few minutes for a typical menu.
3. Add dish photos. The media library automatically collects your dish photos from a link (your website, your TheFork page or another online page) or a PDF, and gathers them in one place. You just pick the right photo for each dish.
4. Enable your languages. Choose your guests' languages and proofread your signature dishes.
5. Customise the QR code. Colours, shapes and a logo in the centre: a QR code in your restaurant's colours inspires more trust than an anonymous black square. Download it as PNG, as SVG for a printer, or as a print-ready A4 sheet.
6. Print and install. Table tents, stickers, placemats, a board at the entrance: see below for where and how to place them.
7. Test in real conditions. Scan every QR code with several phones, indoors and on the terrace, on Wi-Fi and on mobile data.
You can try it for free, without a credit card, from the QR code menu for restaurants page.
Printing and placing your QR codes
A QR code nobody sees or manages to scan is useless. A few simple rules:
- Size: allow at least 2.5 to 3 cm per side on a table. The further away the guest (poster, window), the bigger the QR code must be.
- Contrast: a dark QR code on a light background reads best. Avoid pale colours and busy backgrounds.
- A call to action: "Scan to see the menu" or "Menu & allergens" next to the QR code removes any hesitation.
- A quiet zone: keep an empty margin around the QR code, with no text or decoration touching its edge.
- Logical locations: on every table, at the entrance for passers-by, and on the terrace where the sun won't cause glare.
- A paper alternative: keep a few paper menus for guests without a phone or who prefer paper. Local rules on displaying prices outside the restaurant still apply.
Keeping your menu alive
The point of a digital menu is that it evolves with your kitchen:
- Sold-out dishes: hide a dish in one click to avoid disappointment at ordering time.
- Specials and dishes of the day: add them in the morning, remove them in the evening.
- Multiple menus: lunch, dinner, wine list, cocktail menu, each with its own QR code.
- Seasons: change the menu without touching your printed materials.
The same space can also host other useful QR codes: guest Wi-Fi, your social media, bookings, or a Google review QR code inviting guests to share their experience.
Measuring how your menu is used
A dynamic QR code counts every scan. Without cookies or personal data, you know how often your menu is opened, at what times, from which countries and on which devices.
These figures support concrete decisions: spotting the QR code location that works best, seeing whether the terrace is under-equipped, or checking that an enabled language is actually used.
How much does a QR code menu cost?
Prices vary widely by type of solution:
- Free generator: enough for a static QR code pointing to a PDF, but with no QR code updates, no statistics and no interactive allergens.
- Specialised solution: a monthly subscription including the interactive menu, dynamic QR codes, translations and statistics.
At Pliyos, the Resto plan costs €19 per month per restaurant (excluding VAT), with 4 QR codes, 3 translation languages on top of the original one, and allergen filters. Each additional restaurant costs €10 per month, and annual billing gives 2 months free. Prices are also available in USD and GBP on the pricing page.
Mistakes to avoid
- Putting a PDF behind the QR code. The main source of guest frustration.
- Using a static QR code. The first time you change tools or address, everything must be reprinted.
- Forgetting to update. A price on the menu that doesn't match the bill immediately creates distrust.
- Neglecting allergens. Incomplete information puts both the guest and the restaurant at risk.
- Printing too small or in pale colours. Always test before printing in bulk.
- Removing every paper menu. Some guests don't want to, or can't, use their phone.
Frequently asked questions
Do my guests need to install an app?
No. The phone's camera is enough to scan the QR code, and the menu opens in the browser.
Can I change my menu without reprinting the QR codes?
Yes, if you use a dynamic QR code. The printed QR code stays the same; only the menu changes.
Does a QR code menu completely replace the paper menu?
It can become your main menu, but keep a few paper copies for guests who prefer them, and follow local rules on displaying prices.
How long does it take to create my menu?
From a photo, a PDF or the address of your online menu, the AI import takes a few seconds. Then allow time to proofread prices and approve allergens. For photos, the media library collects them automatically from your website, your TheFork page or a PDF: you just match them to your dishes.
Does the menu work in every language?
You choose which languages to enable from more than 100. Guests switch language directly from the menu.